What are Scaled Images?
It’s basically an image that has been scaled to match the exact size defined in CSS or HTML.
For instance, let’s say your source image is 400 x 400 but you want to display it at 40 x 40. To achieve this, first, browser will have to download this large file and then reduce its size to 40 x 40, which is the actual requirement.
This is an inefficient method as the browser has to download a large size picture than compute it to the smaller size, which may increase the load time of a website.
Opposed to this, the more efficient method should be rather than using 400 x 400 image, users must use the accurate required image size because when file size will be accurate, page will load faster and improve your website’s performance.
To read the full tutorial visit Hostinger.
What are the advantages of Serving Scaled Images?
Inappropriate sized images are the worst enemy of a website’s performance as they can seriously delay page load time.
Opposed to this, properly sized images not only improve the load time of your website but also save many bytes of data.
Besides this, it also helps your website to load faster on small devices such as smartphones and tablets that have been widely used to access the internet.
Moreover, in the modern Search Engine Optimization scenario, scaled images have turned into a leading recommendation to enhance website’s ranking on popular search engines like Google, Bing, etc.
How to Analyze and Fix Serve Scaled Images Issue
There are a lot of ways you can fix to serve scaled images issues. However, the most recommended method is given below. Remember, every image which size is greater than your content width will have this issue.
Before you start with this guide, you need the followings:
FTP Access-(Image directories)
Image Editor-(Any online image editing tool or paint)
Step-1 First, Analyze Your Site
You can use any tool but I would suggest using GTMetrix since it identifies the accurate image dimension that should be used.
I have also used this tool to analyze one of my sites built in WordPress. The tool provided me a list of images with their exact location and suggested value.
I am sharing the snapshot of the same with you below.
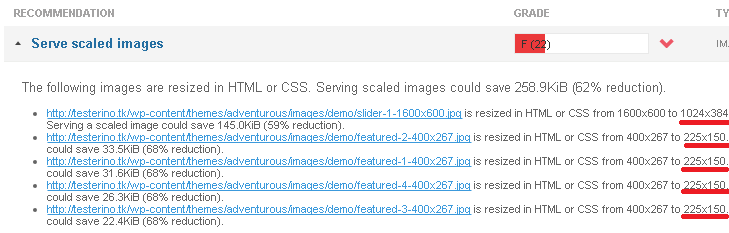
GTMetrix, showed me the exact size of the uploaded image and recommended size as well.
Step-2 First, download the images you need to scale down. The images identified by GTMetrix tool can be downloaded using any FTP client.
You can use ‘Paint’ application, which is easily available in all Windows operating systems to scale down the images. Besides this, you can also use online image editor tool such as picresize.
Now scale down images to the recommended values.
Save the image with the same filename so that you can easily replace the old ones without making any changes in the script code.
Step-3 Test The Changes
Now it is time to test the images. Make sure you have re-uploaded the same images with the same filename so that you don’t encounter 404 error.
Hopefully, this short guide will help you to serve scaled image and increase your website’s performance.